Wednesday, October 31, 2007

Mrs. Field's Chocolate Chip Cookies

Ahhh… the luxury of a refrigerator… Finally… it’s a week later than I thought, but I’m still happy. So, now I can continue living like a regular human being. Here it is… nothing fancy… just your basic Kenmore.
Whats that? You want to see inside? You think this is like a blogisode of Cribs or something??? I’m no backstreet boy, you don’t need to see the inside of my fridge… ok, ok fine…

So, I spent 100 bucks at the grocery store yesterday, and that’s all that is in my fridge. Sad, huh?

Anyway, so, last night I decided to do my first baking in the condo. I couldn’t figure out what I wanted to make, but I finally settled on yet another Chocolate Chip Cookie Recipe. Cause, let’s be honest here folks, can you ever make chocolate chip cookies too much??? Yeah, I didn’t think so.

I found this recipe on Recipezaar and supposedly it’s the copycat recipe for Mrs. Fields Cookies.

Now, here in Nashville we have a company called Christie Cookies and they make the absolute BEST cookies. Hands down. They are super buttery, super chewy and just perfection. Especially their white chocolate macadamia nut cookies. (I’m not a huge fan of the taste of the chocolate chunks they use in their chocolate chunk cookies, but the cookie itself is just heavenly). Well, since it’s a small, local company, I couldn’t’ find any copycat recipes for it, so Mrs. Fields will have to do.

Now, of all the things I bought at the grocery store… I forgot salt!!! Luckily, I realized this and found this salt packet lying around the kitchen at my office…
It wasn’t quite enough salt, but I used salted butter, too.

So, these cookies are delicious! I ate about ½ cup of raw dough and about 6 cookies as they came out of the oven last night and they were pretty crispy… well, this morning I had half of one and wow, they were soft and chewy and perfect! Very good cookies. I will definitely use this recipe again when I need a good chocolate chip recipe.

Monday, October 29, 2007

Italian Cream Cake

My mom’s birthday was Friday.

Happy Birthday Mom!

And so a couple of weeks ago, I asked her what she wanted for dessert for her birthday. She really didn’t hesitate at all, but said… Italian Cream Cake. I had no idea what the hell an Italian Cream Cake was, but I was very excited because it had the word “cake” in the title.

Ever since I’ve started this blog I’ve wanted an excuse to bake a cake. But, you can’t really ship cakes and the idea of making a cake for just me… well, its kind of sad (but that alone wouldn’t have stopped me, trust me) and its also just too calorically tempting to have a whole cake sitting around begging to be consumed.

So, finally… a cake!!! I started off by googling Italian Cream Cake and then I realized that it’s basically a cake for those of us who love pecans, cream cheese, coconut, and moist cakes. Jackpot.

I did further research and found that Jennifer at Bake or Break had used the southern living recipe and hers looked awesome! So, I printed the recipe and read through it and don’t forget the icing recipe

It sounded really easy.

Now, let me preface this by saying, I’ve only made two cakes from scratch before. One was a coconut cake for Christmas (which was VERY difficult and required lots of strange ingredients, but very tasty) and the other was Martha Stewarts Red Velvet Cake (which, again, I remember being kind of hard to make, but yummy!!!!) for Thanksgiving one year. So, I kind of expected Cakes in general to be difficult to make.

This one was a breeze! Really… from the batter to the icing, it was really easy. And even though I couldn’t make this in my kitchen (still no fridge), I did get to use my housewarming gift from Steph & Justyn!!!!!! My new mixer!!!! See how pretty she is?? I named her Betty.
Betty is my 9 speed kitchen aid mixer (she also has matching bowls!!!!). And Betty kicks some major ass in the mixing department. I used her for both the batter and the icing. Awesome.


Okay, so back to the recipe. It is delicious. It’s not a super moist cake, it’s more of a dense, thick cake. Very mild flavor, but incredible. Normally, I hate cold cake, but I actually like this cake straight out of the fridge instead of after it’s been sitting around for awhile. This is definitely going to be made again. Yum.

By the way… I have a guest photographer for this entry, my brother Jason took the pics of the cake. He better watch out, or I’m going to be calling him over twice a week to take photos for me!

Thursday, October 25, 2007

No Fridge Cookies

This is my refrigerator:
ok, well… this is where my refrigerator will be once I actually get it delivered. I ordered it last Saturday along with a tv and while I have the tv, I don’t have the refrigerator, yet.

You don’t realize how hard it is to live without a fridge. I mean, it’s really hard. I feel like I’m not really living there. I feel like I’m just the cleaning lady there or something. But come on, I bet even cleaning ladies snag diet cokes from the fridge when no one is home, right??

So the other afternoon, I went to Kroger and milled around the baking aisle trying to think of something that I can make that doesn’t require a refrigerator and that contains items that don’t have to be refrigerated. Not easy. Not easy at all.

I ended up purchasing the following items:

Graham Cracker Crumbs
Lean Cuisine Mushroom Pizza
Butterscotch Morsels
Peanut Butter Morsels
Sweetened Condensed Milk
Coconut

And what I ended up with is a fudge! And it’s good! Really good! Here is how I did it:

No Fridge Fudge

1 cup butterscotch morsels
1 cup peanut butter morsels
1 ½ cup graham cracker crumbs (I eyeballed it)
1 can sweetened condensed milk
1 cup coconut

Melt morsels in a microwave safe bowl. Add the sweetened condensed milk. Then stir in the graham cracker crumbs and coconut and press into a 8x8 inch pan.

Let it set for 3-4 hours.

You could also make this a chocolate fudge, by using chocolate morsels and chocolate wafer crumbs.


Monday, October 22, 2007

Rich & Dark Brownies

So, Friday I closed on my first home! A cute 1 bedroom, 1 bath condo in Midtown and I couldn't be happier! Once I get my kitchen all squared away this week, I'll post some photos! But for now, I'm limited to what can be microwaved or cooked on the stove or in the oven that doesn't require refrigeration or freezing. Although, that issue will be remedied tonight when my refrigerator is delivered! Yay!

This has been a long process, I first reserved this unit back in April of 2005. And so yesterday, in the midst of running, shopping, putting an entertainment center together, packing, doing laundry, and moving, I decided to bake some brownies to mail to my Realtor's office and my Banker's office. They were both really great and answered all my dumb questions without making me feel like I was asking dumb questions and I wanted to show my appreciation.

The Nashville newspaper, The Tennessean, recently asked readers for Brownie submissions. Now, the print edition came out in last week's Food Section, but being the wonderfully connected person that she is, Anna, over at Cookie Madness somehow got a hold of the recipe the week prior and made them. So, after seeing how hers turned out, I cut the recipe out of the paper and whipped them up this weekend.

They are delicious and extremely easy! Normally, I like chewy, thick brownies. But these brownies are fudgey. But they are so good, I mean really rich and gummy, but still light. Hard to explain, but these will definitely be made again, next time I might add some chocolate chunks to the batter, just for some added chocolate.

Rich & Dark Brownies
from Wanda Thompson, printed from the Tennessean

2 sticks of butter
4 1 oz squares of unsweetened chocolate
3/4 cup of semi sweet morsels (I actually used 1/2 cup and then 1/4 cup milk chocolate)
4 beaten eggs
2 cups of sugar
1 cup plain flour
1 tsp vanilla
1 cup of nuts (optional)

Preheat oven to 350 degrees. Grease a 13x9 inch pan.

Combine butter and both chocolates in a saucepan and slowly melt on top of stove, stirring frequently.

Separately in a bowl combine the eggs and sugar and mix well (she said to use a mixer, but I dont have one and I just beat with a whisk for awhile and that worked fine). Now, if you like a shiny, cracked top on your brownies, you need to do this step for awhile. Beating the eggs with the sugar really well is what produces the shiny, cracked top on a brownie.

Add the flour and vanilla to the sugar and eggs and mix to combine. Once the butter and chocolate have melted, make sure it isn't too hot and pour into your bowl. Stir to combine. Pour into greased pan and bake for 15 minutes. After 15 minutes check the brownies and turn down to 325. Bake for 5 more minutes and then check doneness.

Once cooled, use a plastic knife to cut the brownies (keeps things cleaner).

Thursday, October 18, 2007

Low Country Bars

Ok, usually, I can make a batch of cookies and get away with eating 2-3 of them before I’m sick of them. (When I say 2-3, I’m of course not including the additional 2-3 cookies worth of cookie dough that I’ve scarfed down as well…but those calories don’t count… cause it’s raw, right? Yeah, that’s what I thought).

But these cookies… these simple, sugary bits of goodness are like crack. They should actually be called Crack Cookies. Because once you taste them you know you are headed towards an all day sugar headache.

I’ve made them twice before… once as a test run and then again for my friend April’s Bridal Shower. And each time, I ate so many that I actually went into a diabetic coma and woke up 4 days later with the icing crusted around my finger tips and my name on the pancreas donor waiting list. It’s bad. Very Bad. They are really sweet though, some people might think they are too sweet. (As if anything could ever be too sweet. Hmph).

What I’m saying folks… is that these cookies should come with a warning label. Proceed with caution…

This is another recipe from Paula Deen. God Bless Her.

I don’t like the way she wrote the instructions for this recipe, so I’ve changed them to make it easier to follow:

Low Country Bars (or as I like to call them Sugar High Bars).

Filling:
1 14.4 ounce box of Graham Crackers *You wont use whole box
¾ cup butter
1 cup sugar
1 cup coconut
1 cup pecan pieces
½ cup milk
1 egg

Topping:
2 cups powdered sugar
1 teaspoon vanilla
4 tablespoons (1/2 stick) butter
3 tablespoons milk

First, line the bottom of a 13x9 inch baking dish with graham crackers (I usually use 7 whole graham crackers for both the top and bottom.

Crush one cup worth of graham crackers into crumbs and place in a bowl, add pecans and coconut to bowl and set aside.

Measure your ½ cup of milk into a bowl and crack egg into the bowl and gently mix together; set aside.

In a medium saucepan, melt the butter and add sugar. Stirring constantly (so as not to scramble the egg) add the milk and egg mixture to the pan and bring all to a bowl while you stir constantly. This takes about 10 minutes, because you want to start out a lowish heat and then work your way up (again, so as not to scramble the egg… you could also temper the egg mixture before you add it in, if you like, but I usually don’t).

Once boiling, take off the heat and add the pecans, graham crackers and coconut. Stir to mix well, then pour over the graham crackers in the pan and spread evenly. Top with another layer of graham crackers.

Prepare your icing: Combine all icing ingredients and stir well. You want it to be thick but spreadable. Add extra milk if you need to thin it out. Pour on top and smooth over the whole pan. Chill and cut and serve.

They taste great both chilled and at room temperature, but for storing you need to keep them in the fridge.

Tuesday, October 16, 2007

World Peace Cookies

When I first starting reading food blogs, I noticed a bunch of entries devoted to this cookie: The Korova Cookie a.k.a. World Peace Cookie. Most people raved over it. It never really looked like something I would be into, so I never printed the recipe out.

This weekend, I had every intention of making Oatmeal Creme Pies. I bought all the ingredients, was ready to go. But when Sunday rolled around, I just wasn't feeling them. I wanted something chocolatey... so, I decided to try this cookies once and for all.

I made a special trip to the grocery to get Fine Sea Salt and Unsalted Butter (I typically use salted butter... I'm a salt fiend). And I got to work.

These cookies are tasty. Especially when still warm (not hot). They have a GREAT texture that you don't often find in cookies. A sandy, yet soft texture. But, my palate isn't very sophisticated. I like sweet chocolate, not bittersweet chocolate. So, I think I'll try these again with a couple of changes to the recipe:

1. I think I will actually use more salt. Maybe 1/2 tsp instead of just a 1/4.
2. I think I'll mix some milk chocolate along with the bittersweet chocolate. Just to give the cookie more sweetness for my palate.
3. I'll add a touch more vanilla. (Have I mentioned I love vanilla?).

These are very good cookies, but not the worlds greatest cookie as I've seen it referred to before. I'm still searching for that :)

Korova Cookies a.k.a. World Peace Cookies Recipe

Also, a note on the picture. I've found that taking pictures of chocolate chocolate chip cookies is a difficult task. Hopefully this picture looks appetizing, because my last blog entry that featured chocolate chocolate chip cookies prompted my friend Jeff to say that they looked like dog turd cookies.

Monday, October 15, 2007

The Snickerdoodle.

So, Saturday morning, I ran an Oktoberfest 5k here in town. It was a cool crisp fall-like day for once. So, when I got home, I decided that I'd make something homey tasting. Homey to me, always equals cinnamon. There is just something about the smell and flavor of cinnamon that is comforting. It's like a warm quilt.

Okay, that sounds really lame.

Anyway, so, I was thinking cinnamon and I decided to attempt to make Snickerdoodles. Now, my only experience eating snickerdoodles has been from Mrs. Fields in the mall. And I think the only reason I had one, was because they were giving them away free. (Normally, I opted for white chocolate macadamia nut, or chocolate chip). And I really liked it. The perfect cookie texture, nice and chewy... almost caramel-like in texture in the center, with a lightly crunchy exterior.

I searched around for some recipes and came up with a Martha Stewart one. I'm not crazy about this recipe. I expected more chewiness and less cakey-ness. I also feel like they need to be more sweet. They turned out really pretty though. But, the next time I am craving a snickerdoodle, I'll try a different recipe. These are good. Just not GREAT.


*** I did make one change to the recipe, I added a little vanilla. I just can't bake anything without vanilla. It's a sickness.

Friday, October 12, 2007

Whatchamacallit (basically, a scotcheroo)

I left work last night at 6:30 and didn't get home till around 7:30. There were two accidents on my way home. This is a pretty stressful time at work. October 15th is our second biggest tax filing deadline (well, maybe third... March 15, might be the second). Monday night when I get home from work, I'll be a happy camper.

So, last night, I was craving something sweet, but it had to be something easy. So, I opted to make Peanut Butter Rice Krispie Treats. As I was stirring the sugar on the stovetop, I started to think about a butterscotch and chocolate topping that I saw for one of the peanut butter rice krispie treats recipes... and so I decided to melt some chocolate chips and butterscotch chips to pour on top, sort of like an icing (but better). I ate a couple last night while they were still gooey and warm (YUM), and then also again this morning, after they had firmed up. They remind me so much of a whatchamacallit candy bar, that I've decided to change the name. I'm calling them whatchamacallits.

These are so freaking simple, take about 10 minutes and are so delicious.

Whatchamacallits

This is half batch, I put in an 8x8 square pan.

1/2 cup light brown sugar
1/2 cup white corn syrup
1/2 cup peanut butter
3 cups Rice Krispies Cereal
1/2 cup semi-sweet chocolate chips
1/2 cup butterscotch chips

Measure out the rice krispies in a large bowl, set aside.

Combine brown sugar and corn syrup in a medium saucepan and cook on medium heat till mixture begins to bubble on top.

Take off heat and stir in peanut butter.

Add mixture to the rice krispies and stir until all the krispies are coated, then pour into an 8x8 greased dish. Smooth over with spatula and press down kind of firmly into pan. Set aside.

Melt chocolate chips and butterscotch chips together in the microwave slowly until melted. (Make sure you check on it every few seconds, to keep it from burning). Stir chips together well and then pour onto the rice krispies and spread over like icing.

It will take the icing awhile to set up, but it eventually did (overnight).

Enjoy.

Wednesday, October 10, 2007

Another Chocolate Chip Recipe

The following post may sound like a paid advertisement for all
things Martha Stewart, but I assure you, as much as I love Martha,
I'm not on her payroll (sadly).
Sara and I met on our 3rd or 4th day as freshman at the University of South Carolina. My roommate and I were at the Student Union checking our mail and noticed a girl having some problems with her mailbox lock. I went over and offered my help to her, turns out, she had been mailed the wrong combination. Anyway, my roommate and I left and went back to our room. Turns out, the girl that I helped lived right next door to me. Literally. Of all the places to meet, not in the hallway, not in the bathroom, but in the student union. We became fast friends and ended up being roommates the next semester when my roommate transferred to UT. We lived together that spring semester and all of our sophomore and senior years.

She’s a great friend. Always there when you need her and she’s one of those friends that you can talk to once in 3 months and neither of you holds a grudge for not being in contact sooner. You just pick back up where you left off.

Sara and I exchanged some emails last week and I decided that she needs a little pick-me-up. So, I made her some cookies.

I wanted to make chocolate chip cookies for her, because when we were in college, anytime that we went to the mall, she ALWAYS went to the cookie store and got one of those huge chocolate chip cookies. You know, the one that is kind of like a cookie pie. And then she would proceed to eat on the cookie for the rest of the week. So, I knew I wanted to make a chocolate chip cookie.

I decided to try a new cookie recipe and flipped through my printed out recipes and decided on this one from Martha Stewart.

I made large cookies (they fit in the cute boxes much better) and they came out soft on the inside and crispy on the outside. Good cookies. Probably my second favorite chocolate chip recipe.

Martha Stewart Cookies for a Martha Stewart Cookie Box.
Perfection.

Monday, October 8, 2007

Cherry Pie

So, while I inherited my dads dark eyes and hair, it was from my mom that I inherited my sweet tooth. Generally, while I would try to save some room for a sweet dessert, my dad would just prefer another helping of dinner to a decadent dessert. He’ll eat desserts, yes, but he doesn’t crave sweets like I do.

But, his favorite dessert is well known in my family and that’s a cherry pie. Growing up we had a cherry tree and my mom would make my dad fresh cherry pies, a lot. She would freeze the fresh cherries to make pies when the cherries weren’t in season. Sadly, the cherry tree died after about 10 years, I think it was too close to the house and just didn’t have enough room to continue to grow, but what do I know? I may have been president of my FFA chapter, but I was never much of a gardener.

Okay, back to the pie. So, my dads birthday is today and I decided to tackle a cherry pie recipe. I perused some pie recipes online and found this recipe at Epicurious. I went off to Wild Oats to see if I could find the ingredients that I needed. They didn’t have any! So, I went to Harris Teeter… and they didn’t have exactly what I needed, but they did have a selection of canned cherries that I thought I could work with.

So, I studied the epicurious recipe and then I looked at the recipe that my mom always used to make her cherry pie and I came up with my own recipe. And this pie turned out delicious! My crust was a little on the dry side, but still tasty. I will definitely keep and use this recipe again! Tart and sweet all at the same time!

Cherry Pie

2 cans of Sweet Pitted Bing Cherries (14.5 oz cans)
1 can of Tart Cherries
3 tbsp cornstarch
½ cup Dried Sweet & Tart Cherries (about 3 ozs)
¼ cup Granulated Sugar
1 tbsp Butter
½ tsp Almond Extract
Red Food Coloring
Cream or milk
Pie crust for a double crust pie

Strain syrup from bing cherries and reserve juice. Strain tart cherries and reserve it’s juice separately. Combine the bing cherries and the tart cherries in a bowl with ¼ cup of the sweet juice (save the leftover juice), 2 tbsps of the tart juice, and the cornstarch; stir to blend and set aside.

Combine 1 cup of the sweet juice along with 1 tbsp of the tart juice with the dried cherries in a large saucepan. Cover and let simmer for 10 minutes on medium low heat to allow the dried cherries to plump up. Uncover and increase the heat to medium and simmer until mixture bubbles thickly and it has reduced to about ¾ cup, stirring occasionally (about another 10 minutes). Add your other cherry mixture to the saucepan mixture along with the butter and heat thoroughly over medium heat until mixture bubbles and thickens (about 3-5 minutes). After mixture has thickened, pull off heat and add almond extract and a few drops of red food coloring. Transfer pie filling to a medium bowl and let it cool completely.

After it has completely cooled, position a rack in the second to the bottom row in your oven and preheat oven to 400 F. Roll our pie disk on a floured surface to 12 inch round. Transfer to a 9 inch diameter pie dish. Trim dough overhang to 1 inch. Put pie plate into the fridge while you roll out your top. Roll the top crust to 12 inch diameter. Spoon pie filling into bottom crust and then cover with top crust. Crimp edges decoratively and lightly brush the top and edges of the pie with whipping cream lightly. (I also sprinkled sugar on top the crust). Make four slits in the top of the crust to allow the steam to escape.

Place aluminum foil strips around the edges of the pie to keep them from browning too quickly. Put pie on a baking sheet with a rim and place into the preheated oven.

After 25-30 minutes, remove the aluminum foil and continue to cook.

Cook for about 50-55 minutes, until crust is golden.

Transfer pie to rack and allow to cool for 2 hours. Serve pie lukewarm or room temperature.
Tip: When transferring rolled pie dough to pie dish fold crust in half or in quarters and then place the dough in position in the pie dish and then unfold it to fit the dish.


Thursday, October 4, 2007

Butter Pecan Turtle Bars

So, this is the last of the recipes from the baking date! And it is yummy!! And fairly simple, actually.

I kept calling these cookies, toffee cookies. And I think that would actually be a better name for them, because they are crunchy like toffee... not caramel-y gooey like turtles are.

I found this recipe here and was pleasantly surprised when my bars came out looking almost exactly like theirs! Woo Hoo. Usually my creations turn out looking like the poor, forgotten step child of the originals.

I will definitely be making these again. They hit the sweet tooth trifecta... chocolatey, crunchy yet soft crust, and buttery nut goodness.

Wednesday, October 3, 2007

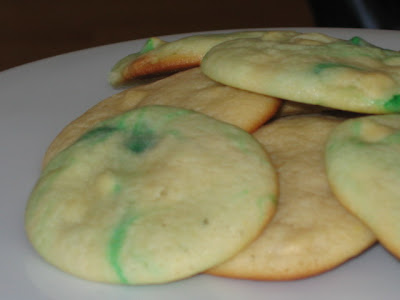
Guest Blogger: Steph's Key Lime Cookies

First of all, I must admit that I am a virgin blogger... this will be the first blog I've ever written my entire life. Intimidating? Yes, a little... but I will not be discouraged. I accept the challenge wholeheartedly!

Here is my recipe from what Amy has referred to as our Baking Date, or what I like to call "The Big Bake".

I love key lime. And when I say "love", I mean LOVE it. I love key limes all by themselves (they're so cute!), key lime soda, key lime truffles (thank you, Godiva), and of course, key lime pie. So, when I was browsing for my Big Bake recipe, I saw a recipe for key lime cookies and couldn't resist. There are a lot of key lime cookie recipes out there, actually, but don't be fooled. I chose this one from Cookie Madness because it specifically said they were "chewy" which is an absolute MUST in my cookie book. These may be a little tart for some folks, so watch out!

The recipe was very straightforward and easy. Because Amy and I are such baking fiends, we decided to double the recipe (of course, there is no such thing as too many key lime cookies!) After baking about half the dough, we added some green food coloring just for giggles. No, they didn't taste more limey that way, but it was still fun.

The recipe below is the DOUBLED recipe, which makes about 6 dozen cookies.


1 cup butter — softened

2 cups sugar

2 large eggs

2 large egg yolks

3 cups flour

2 teaspoons baking powder

1 teaspoon salt

1/2 cup key lime juice

1 tablespoon lime zest (which I didn't use, because my hand started cramping)

1 1/2 cups white chocolate chips


Cream butter, sugar, egg, egg yolk in a large bowl — blend in flour,baking powder, salt, lime juice and lime zest.


Fold in white chocolate chips.


Roll dough into walnut sized balls. Actually I used a spoon because the dough was pretty wet, and there was no way I could roll them without making a big mess.


Place on ungreased sheet. These spread out quite a bit, so give them plenty of room.


Bake at 350 degrees F for 10-12 minutes.


--Stephanie, Guest Blogger.


Tuesday, October 2, 2007

Sour Cream Pound Cake


So, what’s better than spending an afternoon baking all day?

Doing it with your best friend!

Saturday, My friend Steph (formerly known as SQB… hey, I try to be careful with people’s online identities and make sure it’s okay with them before I use their name… so, back off) and I decided to have a baking party! Well, it was more like a baking date. I think the rule is you must have at least 3 people for a party… two and it’s just a date. So, Baking Date!

We decided on making a Pound Cake recipe that she had and then we each picked a cookie recipe to make, too!!

3 recipes in one day!!! Were we crazy?? Maybe, but it was really fun!

So, I’m going to go ahead and post the Pound Cake recipe now... and then she is going to type up an entry for her cookies and then I’ll post my cookies later, too!

So, this is a Sour Cream Pound Cake Recipe from Steph’s friend Julie’s Mom. (Say it out loud and you’ll get it). We decided to break the recipe into 4 mini loaves and use almond extract for 2 and vanilla extract for the other 2.

Things started off well, if by well you mean, having your handheld mixer die on you when you start to cream the butter and the sugar!

RIP........... GE Electric Handheld Mixer

The handheld mixer had a good run. It’s been around for 35+ years. Strangely enough, it was my fault and not old age that led to its ultimate demise. You see, the cord fell out of the base and instead of looking and gingerly placing it back in, I just picked it up and jammed it in back in there. My lack of attention to detail caused one of the prongs to give up and die. After attempting with tweezers to rectify the situation, we bailed and pulled out the cuisinart.

Anyway, the recipe was pretty easy. This was only the 2nd pound cake recipe, I’ve ever made (the other being a cream cheese pound cake) and it easy and straightforward.

The mini loaves made things a little interesting, because we had a hard time making sure they were done. They puffed up a lot and the outside edges got really browned, but the center stayed uncooked. Eventually, they cooked all the way through and I think we pulled them out maybe 3-4 minutes too late. But, regardless, they are delicious!

Sour Cream Pound Cake
1 cup butter
3 cups sugar
6 eggs
1 ½ tsp extract (vanilla, almond, etc.. whatever you want)
3 cups flour
¼ tsp salt
¼ tsp baking soda
½ pint sour cream

Mix flour, salt, and baking soda together and set aside.

Cream butter and sugar with a mixer (or, in our case, a food processor). Add eggs one at a time, beating well. Add extract.

Add dry ingredients alternating with the sour cream.

Bake in a 350 degree preheated oven in 2 loaf pans for 1 hour. (Our mini loaves took about 40 minutes).


Doesn't it look so pretty???

Monday, October 1, 2007

Oatmeal Pie

When I was a kid, one of my absolute favorite toys was the Fisher Price Kitchenette. I got it for Christmas one year, and I loved to play pretend House with it. It wasn't as sophisticated as the kitchenettes are these days, I had to use my imagination a lot (which wasn't a problem, I had an imaginery friend, so using my imagination was not a foreign thing to me). I distinctly remember always asking my dad what he wanted me to make him and he always had one answer:

Cherry Pie.

I've never actually made a cherry pie. I've made a few other pies, but I've always been intimidated to make a cherry pie, because it's my dad's favorite pie. I want it to be perfect. Well, his birthday is a week from today and I've decided this is the year. I'm going to make him a cherry pie.

Now, it's been awhile since I've made pie crust. So, I wanted to have a dry run this weekend, just to make sure my skills are up to par.

I recently flipped through our family cookbook and came across a recipe that sounded... really weird. Oatmeal Pie. It was my Grandma Young's recipe (although I never remember having it), and I asked my mom about it and she said that it was very, very good.

I already had all the ingredients and thought... what the heck, I'll give it a try.

I actually only made half a pie. I halved the pie crust recipe and halved the pie recipe and used a smaller dish to bake it and it turned out perfectly! The pie crust was perfect. Flaky, but tender. And the pie... well, it's a little hard to describe, but I kind of think of it as a poor man's pecan pie. It has the texture and flavor of a pecan pie (which is my favorite pie), but, it has a thicker, heartier feel to it. It's delicious and I think next time, I'll add some cinnamon to the pie and maybe use brown sugar instead of granulated sugar and see how it turns it. Delicious.

I now think I'm ready to tackle the cherry pie this weekend!

mmmmm.... see that flaky crust and the thick, creamy filling?
Yum!
Pie Crust
Courtesy of Emeril
Yield: 1 crust
1 1/2 cups plus 2 tbsp of all purpose flour
1 tbsp of sugar
1/2 tsp salt
1 stick cold unsalted butter, cut in 1/4 inch pieces
2 tbsp solid vegetable shortening, cold, cut into pieces
3 tbsps of ice water
Sift the flour, sugar, and salt into a large bowl. Using your fingers or a pastry cutter, work in the butter and shortening till the mixture resembles coarse crumbs. Add 2 tbsps of ice water and work with your fingers until the water is incorporated and the dough comes together. Add more water as needed to make a smooth dough, being careful not to over mix. Form the dough into a disk, wrap tightly in plastic wrap and place in the fridge for at least 30 minutes before using.
Oatmeal Pie
Recipe courtesy of Veachel Young
2 eggs, slightly beaten
1 stick of butter, melted
2/3 cup corn syrup
2/3 cup uncooked Oats (I used quick, but I think regular would be better)
1/4 tsp salt
1 tsp vanilla
2/3 cup nuts
2/3 cup sugar
1 unbaked pie shell
Mix all ingredients well and pour into pie shell.
Bake for one hour at 350 degrees.